Kubernetes (k8s) 环境搭建指南
Kubernetes——让容器应用进入大规模工业生产。
Kubernetes是容器编排系统的事实标准
在单机上运行容器,无法发挥它的最大效能,只有形成集群,才能最大程度发挥容器的良好隔离、资源分配与编排管理的优势,而对于容器的编排管理,Swarm、Mesos和Kubernetes的大战已经基本宣告结束,Kubernetes成为了无可争议的赢家。本文对生产环境中 Kubernetes 搭建的过程进行简单记录。
1. 安装 Docker
该部分参考 Kubernetes 官方文档:https://kubernetes.io/docs/setup/production-environment/container-runtimes/
首先,新建 install_docker.sh 文件,并修改文件内容如下
# Install Docker CE
## Set up the repository:
### Install packages to allow apt to use a repository over HTTPS
apt-get update && apt-get install \
  apt-transport-https ca-certificates curl software-properties-common
### Add Docker’s official GPG key
curl -fsSL https://download.docker.com/linux/ubuntu/gpg | apt-key add
# Add the Docker apt repository:
add-apt-repository \
  "deb [arch=amd64] https://download.docker.com/linux/ubuntu \
  $(lsb_release -cs) \
  stable"

# Install Docker CE
apt-get update && apt-get install -y \
  containerd.io=1.2.13-1 \
  docker-ce=5:19.03.8~3-0~ubuntu-$(lsb_release -cs) \
  docker-ce-cli=5:19.03.8~3-0~ubuntu-$(lsb_release -cs)

# Set up the Docker daemon
cat > /etc/docker/daemon.json <<EOF
{
  "exec-opts": ["native.cgroupdriver=systemd"],
  "log-driver": "json-file",
  "log-opts": {
    "max-size": "100m"
  },
  "storage-driver": "overlay2"
}
EOF

mkdir -p /etc/systemd/system/docker.service.d

# Restart Docker
systemctl daemon-reload
systemctl restart docker
之后,为该文件授予执行权限,并执行
chmod +x install_docker.sh
sudo ./install_docker.sh等待脚本结束,完成 docker 的安装
2. 安装 Kubeadm
该部分可以参考官方文档:https://kubernetes.io/docs/setup/production-environment/tools/kubeadm/install-kubeadm/
安装前检查
- One or more machines running one of:
- Ubuntu 16.04+
- Debian 9+
- CentOS 7
- Red Hat Enterprise Linux (RHEL) 7
- Fedora 25+
- HypriotOS v1.0.1+
- Container Linux (tested with 1800.6.0)
- 2 GB or more of RAM per machine (any less will leave little room for your apps)
- 2 CPUs or more
- Full network connectivity between all machines in the cluster (public or private network is fine)
- Unique hostname, MAC address, and product_uuid for every node. See here for more details.
- Certain ports are open on your machines. See here for more details.
- Swap disabled. You MUST disable swap in order for the kubelet to work properly
-
按照官方要求,关闭 swap 交换分区:
首先执行命令:
sudo swapoff -a之后编辑文件:
sudo vim /etc/fstab将含有 swap.img 的那行注释掉 -
修改每个主机的 hostname ,确保唯一,以便区分
sudo hostnamectl set-hostname <设定的 hostname> -
保证网络路由的正确性,要求 iptables 对网桥 bridge 的数据进行处理。在 ssh 中执行下面的代码
cat <<EOF | sudo tee /etc/sysctl.d/k8s.conf net.bridge.bridge-nf-call-ip6tables = 1 net.bridge.bridge-nf-call-iptables = 1 EOF sudo sysctl --system -
检查端口占用情况
k8s 需要保证以下端口畅通:
Control-plane node(s)
Protocol Direction Port Range Purpose Used By TCP Inbound 6443* Kubernetes API server All TCP Inbound 2379-2380 etcd server client API kube-apiserver, etcd TCP Inbound 10250 Kubelet API Self, Control plane TCP Inbound 10251 kube-scheduler Self TCP Inbound 10252 kube-controller-manager Self Worker node(s)
Protocol Direction Port Range Purpose Used By TCP Inbound 10250 Kubelet API Self, Control plane TCP Inbound 30000-32767 NodePort Services† All
安装 kubeadm,kubelet 和 kubectl
kubeadm:用来初始化集群的指令。kubelet:在集群中的每个节点上用来启动 pod 和容器等。kubectl:用来与集群通信的命令行工具。
对于master节点以及 worker 节点,都需要安装这些工具,执行下方的代码:
sudo apt-get update && sudo apt-get install -y apt-transport-https curl
curl -s https://packages.cloud.google.com/apt/doc/apt-key.gpg | sudo apt-key add -
cat <<EOF | sudo tee /etc/apt/sources.list.d/kubernetes.list
deb https://apt.kubernetes.io/ kubernetes-xenial main
EOF
sudo apt-get update
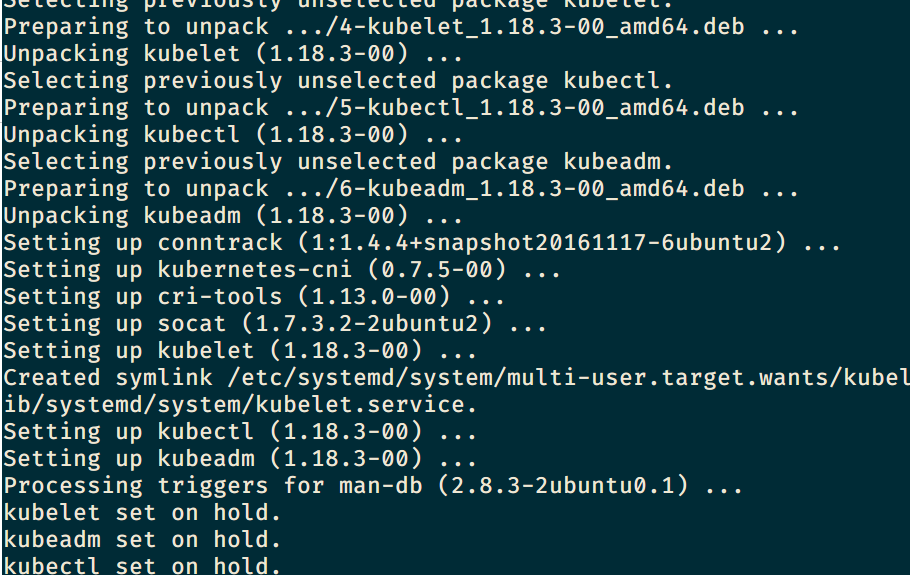
sudo apt-get install -y kubelet kubeadm kubectl
sudo apt-mark hold kubelet kubeadm kubectl安装完成之后,shell 中有如下提示:
3. 使用 kubeadm 创建集群
初始化集群
在 master 机器中执行如下命令:
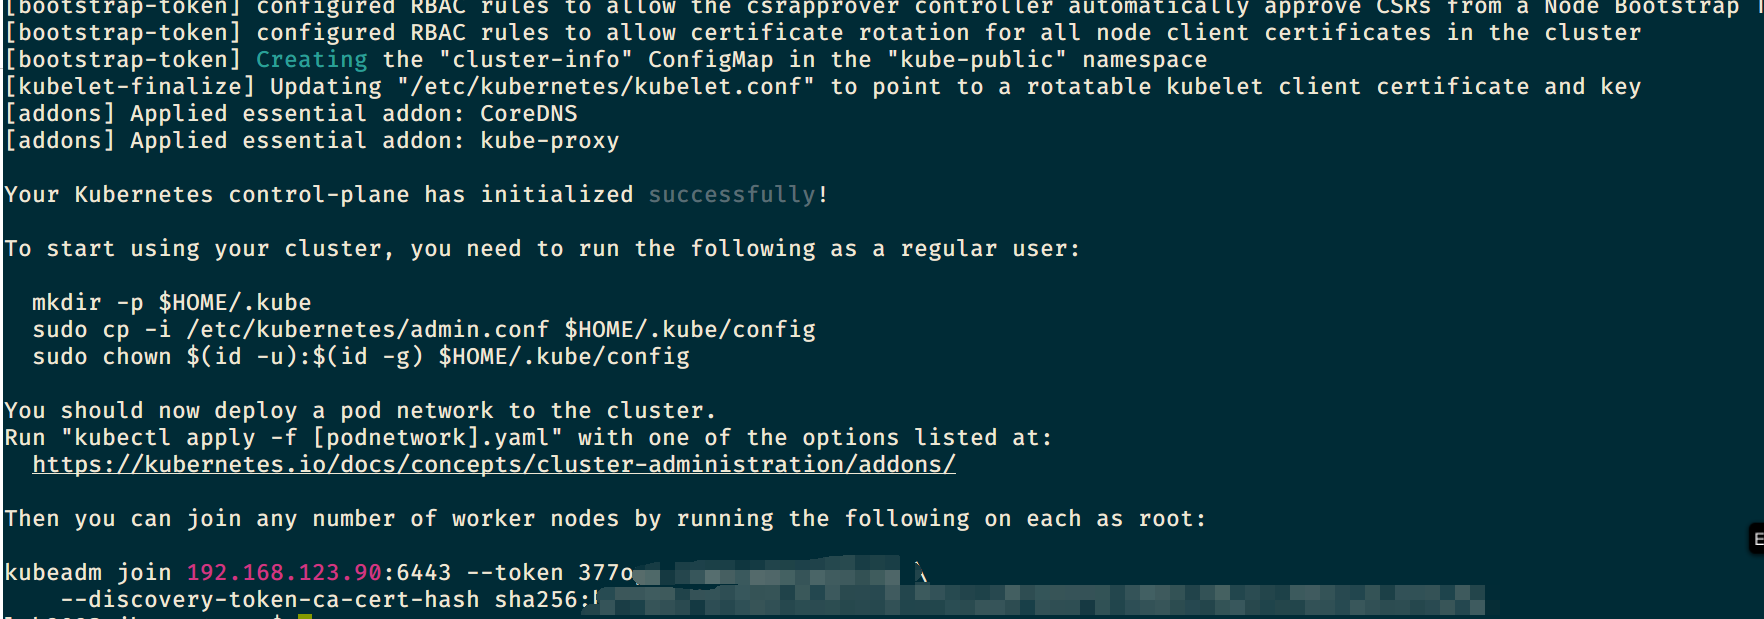
sudo kubeadm init --pod-network-cidr=10.244.0.0/16该命令需要从官网下载资源,需要保证外网畅通,否则耗时极长,命令执行完成后,shell 会出现如下的提示:
[init] Using Kubernetes version: vX.Y.Z
[preflight] Running pre-flight checks
[preflight] Pulling images required for setting up a Kubernetes cluster
[preflight] This might take a minute or two, depending on the speed of your internet connection
[preflight] You can also perform this action in beforehand using 'kubeadm config images pull'
[kubelet-start] Writing kubelet environment file with flags to file "/var/lib/kubelet/kubeadm-flags.env"
[kubelet-start] Writing kubelet configuration to file "/var/lib/kubelet/config.yaml"
[kubelet-start] Activating the kubelet service
[certs] Using certificateDir folder "/etc/kubernetes/pki"
[certs] Generating "etcd/ca" certificate and key
[certs] Generating "etcd/server" certificate and key
[certs] etcd/server serving cert is signed for DNS names [kubeadm-cp localhost] and IPs [10.138.0.4 127.0.0.1 ::1]
[certs] Generating "etcd/healthcheck-client" certificate and key
[certs] Generating "etcd/peer" certificate and key
[certs] etcd/peer serving cert is signed for DNS names [kubeadm-cp localhost] and IPs [10.138.0.4 127.0.0.1 ::1]
[certs] Generating "apiserver-etcd-client" certificate and key
[certs] Generating "ca" certificate and key
[certs] Generating "apiserver" certificate and key
[certs] apiserver serving cert is signed for DNS names [kubeadm-cp kubernetes kubernetes.default kubernetes.default.svc kubernetes.default.svc.cluster.local] and IPs [10.96.0.1 10.138.0.4]
[certs] Generating "apiserver-kubelet-client" certificate and key
[certs] Generating "front-proxy-ca" certificate and key
[certs] Generating "front-proxy-client" certificate and key
[certs] Generating "sa" key and public key
[kubeconfig] Using kubeconfig folder "/etc/kubernetes"
[kubeconfig] Writing "admin.conf" kubeconfig file
[kubeconfig] Writing "kubelet.conf" kubeconfig file
[kubeconfig] Writing "controller-manager.conf" kubeconfig file
[kubeconfig] Writing "scheduler.conf" kubeconfig file
[control-plane] Using manifest folder "/etc/kubernetes/manifests"
[control-plane] Creating static Pod manifest for "kube-apiserver"
[control-plane] Creating static Pod manifest for "kube-controller-manager"
[control-plane] Creating static Pod manifest for "kube-scheduler"
[etcd] Creating static Pod manifest for local etcd in "/etc/kubernetes/manifests"
[wait-control-plane] Waiting for the kubelet to boot up the control plane as static Pods from directory "/etc/kubernetes/manifests". This can take up to 4m0s
[apiclient] All control plane components are healthy after 31.501735 seconds
[uploadconfig] storing the configuration used in ConfigMap "kubeadm-config" in the "kube-system" Namespace
[kubelet] Creating a ConfigMap "kubelet-config-X.Y" in namespace kube-system with the configuration for the kubelets in the cluster
[patchnode] Uploading the CRI Socket information "/var/run/dockershim.sock" to the Node API object "kubeadm-cp" as an annotation
[mark-control-plane] Marking the node kubeadm-cp as control-plane by adding the label "node-role.kubernetes.io/master=''"
[mark-control-plane] Marking the node kubeadm-cp as control-plane by adding the taints [node-role.kubernetes.io/master:NoSchedule]
[bootstrap-token] Using token: <token>
[bootstrap-token] Configuring bootstrap tokens, cluster-info ConfigMap, RBAC Roles
[bootstraptoken] configured RBAC rules to allow Node Bootstrap tokens to post CSRs in order for nodes to get long term certificate credentials
[bootstraptoken] configured RBAC rules to allow the csrapprover controller automatically approve CSRs from a Node Bootstrap Token
[bootstraptoken] configured RBAC rules to allow certificate rotation for all node client certificates in the cluster
[bootstraptoken] creating the "cluster-info" ConfigMap in the "kube-public" namespace
[addons] Applied essential addon: CoreDNS
[addons] Applied essential addon: kube-proxy

Your Kubernetes control-plane has initialized successfully!

To start using your cluster, you need to run the following as a regular user:

  mkdir -p $HOME/.kube
  sudo cp -i /etc/kubernetes/admin.conf $HOME/.kube/config
  sudo chown $(id -u):$(id -g) $HOME/.kube/config

You should now deploy a Pod network to the cluster.
Run "kubectl apply -f [podnetwork].yaml" with one of the options listed at:
  /docs/concepts/cluster-administration/addons/

You can now join any number of machines by running the following on each node
as root:

kubeadm join <control-plane-host>:<control-plane-port> --token <token> --discovery-token-ca-cert-hash sha256:<hash>可以看到,执行成功后,终端会打印出一条连接命令,大致形式如下:
kubeadm join 你的IP地址:6443 --token 你的TOKEN --discovery-token-ca-cert-hash sha256:你的CA证书[哈希]^(Hash)先保存该命令,备用。后续worker pods 需要使用该命令与 master 连接。若该命令没有保存,或 TOKEN 已经过期,可以使用下方命令重新查看 TOKEN 以及 CA 证书哈希:
token. 通过命令
Kubeadm token list找回
ca-cert. 执行命令openssl x509 -pubkey -in /etc/kubernetes/pki/ca.crt | openssl rsa -pubin -outform der 2>/dev/null | openssl dgst -sha256 -hex | sed 's/^.* //'找回
设置当前用户可使用 Kubernetes
安装 Kubernetes 时,使用了 root 身份,为了让当前用户也可以执行 kubectl 等管理命令,需要为当前用户增加权限,执行以下代码:
mkdir -p $HOME/.kube
sudo cp -i /etc/kubernetes/admin.conf $HOME/.kube/config
sudo chown $(id -u):$(id -g) $HOME/.kube/config
若该步骤没有执行,后续操作中,可能会报如下错误:
The connection to the server localhost:8080 was refused - did you specify the right host or port?若当前用户本身为 root 用户 (如 centos)执行以下命令:
export KUBECONFIG=/etc/kubernetes/admin.conf安装网络插件
为了使得 Pod 之间可以相互通信,必须要部署一个 Pod 网络插件
部署 Calico 插件的命令如下:
kubectl apply -f https://docs.projectcalico.org/v3.14/manifests/calico.yaml安装Pod网络后,可以通过检查 CoreDNS Pod是否Running在中来确认其正常工作 kubectl get pods --all-namespaces
4. 新增 pod 加入节点
-
修改 hostname
sudo hostnamectl set-hostname zjh-worker1 -
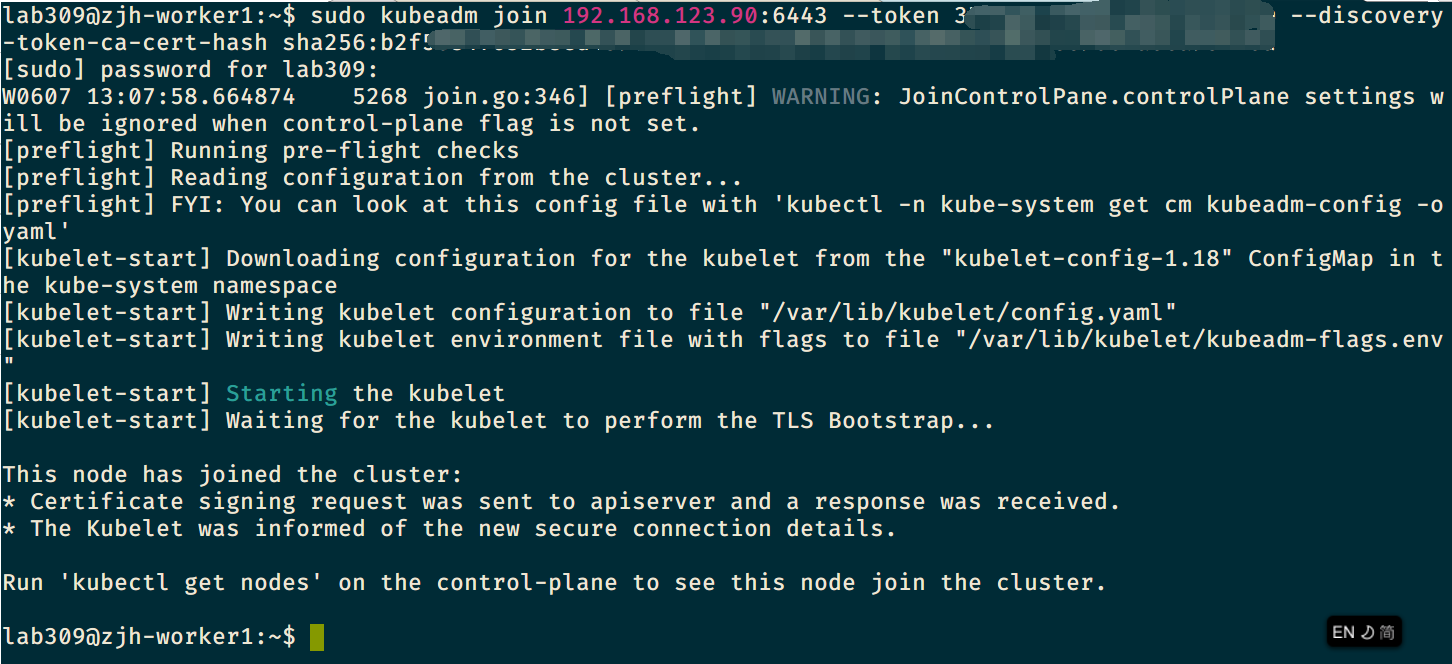
执行加入命令
sudo kubeadm join --token <token> <control-plane-host>:<control-plane-port> --discovery-token-ca-cert-hash sha256:<hash>如果没有 token ,可以在 master 主机中运行以下命令来获取token
kubeadm token list默认情况下,token 会在24小时后过期。如果要在当前 token 过期后将节点加入集群,则可以通过在控制平面节点上运行以下命令来创建新 token:
kubeadm token createCA 证书的哈希值通过以下命令获得:
openssl x509 -pubkey -in /etc/kubernetes/pki/ca.crt | openssl rsa -pubin -outform der 2>/dev/null | \
  openssl dgst -sha256 -hex | sed 's/^.* //'
加入成功之后,pod 终端提示如下内容:
回到 master 终端,执行:
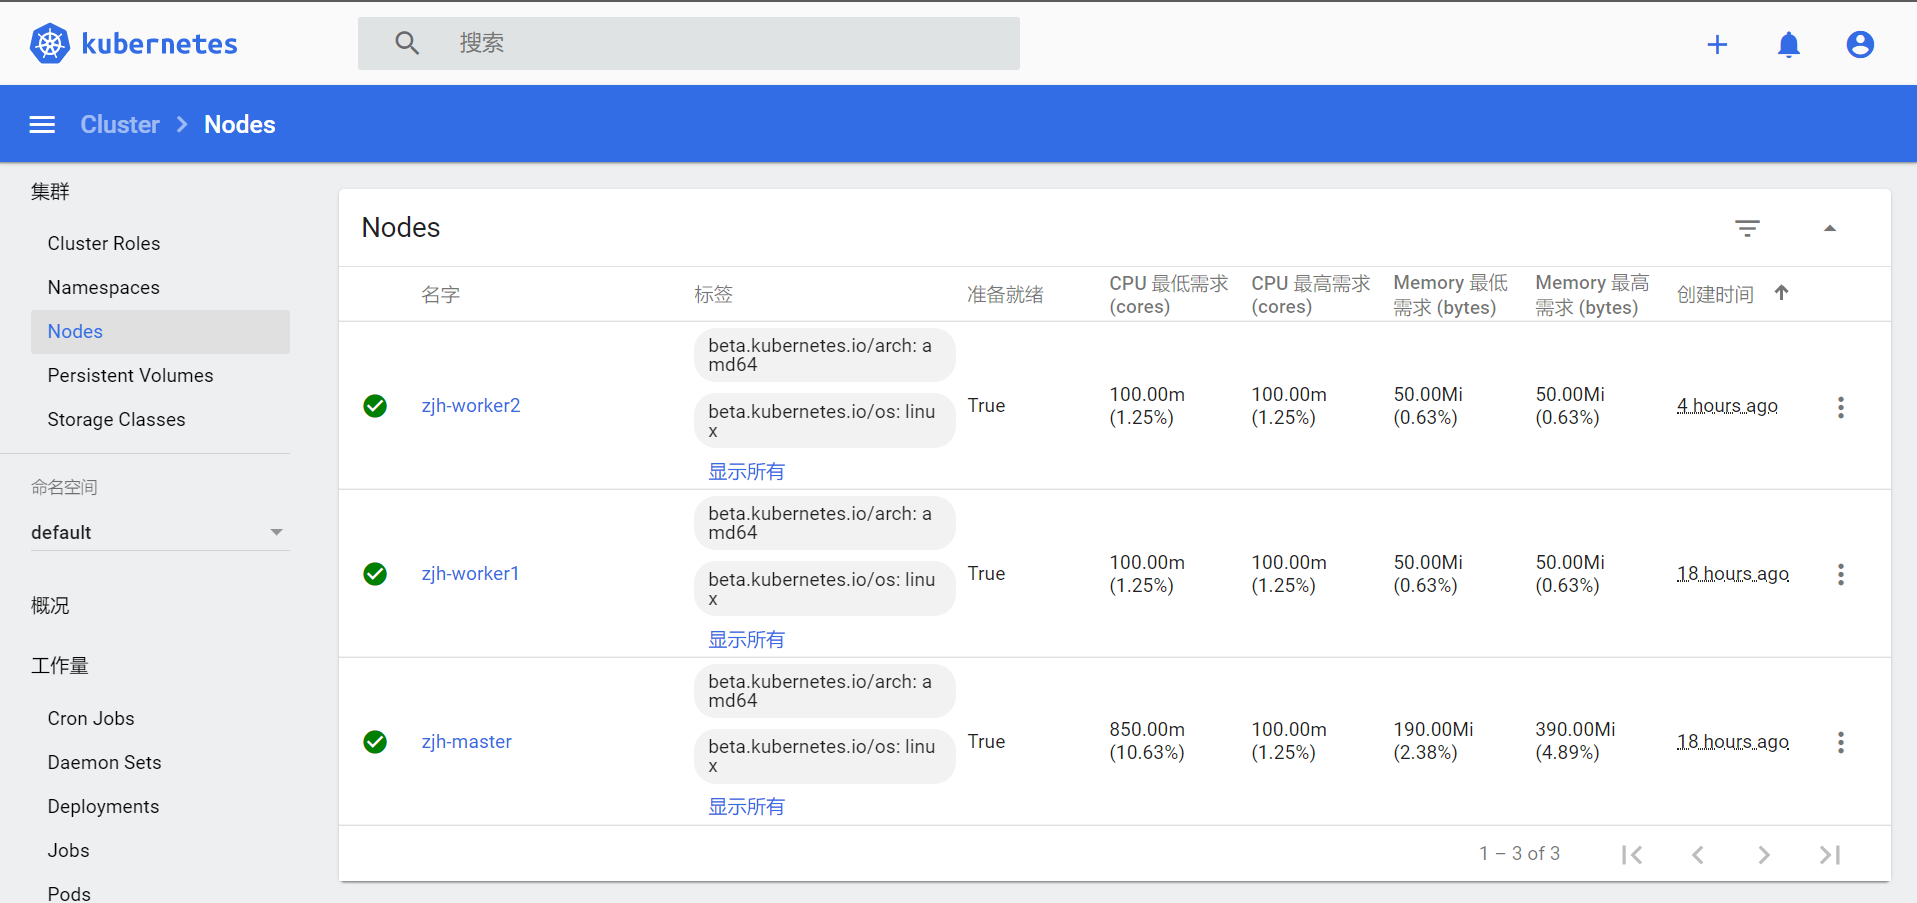
kubectl get nodes
可以看到,nodes 的状态均为 Ready
5. 安装可视化控制面板 Kubernetes Dashboard
Dashboard 的官方库位于:https://github.com/kubernetes/dashboard#kubernetes-dashboard
若只需要本机访问 Dashboard,而不需要网络中的其他机器通过 ip 地址访问该 Dashboard 的话,直接按照 readme 中的配置说明安装即可。
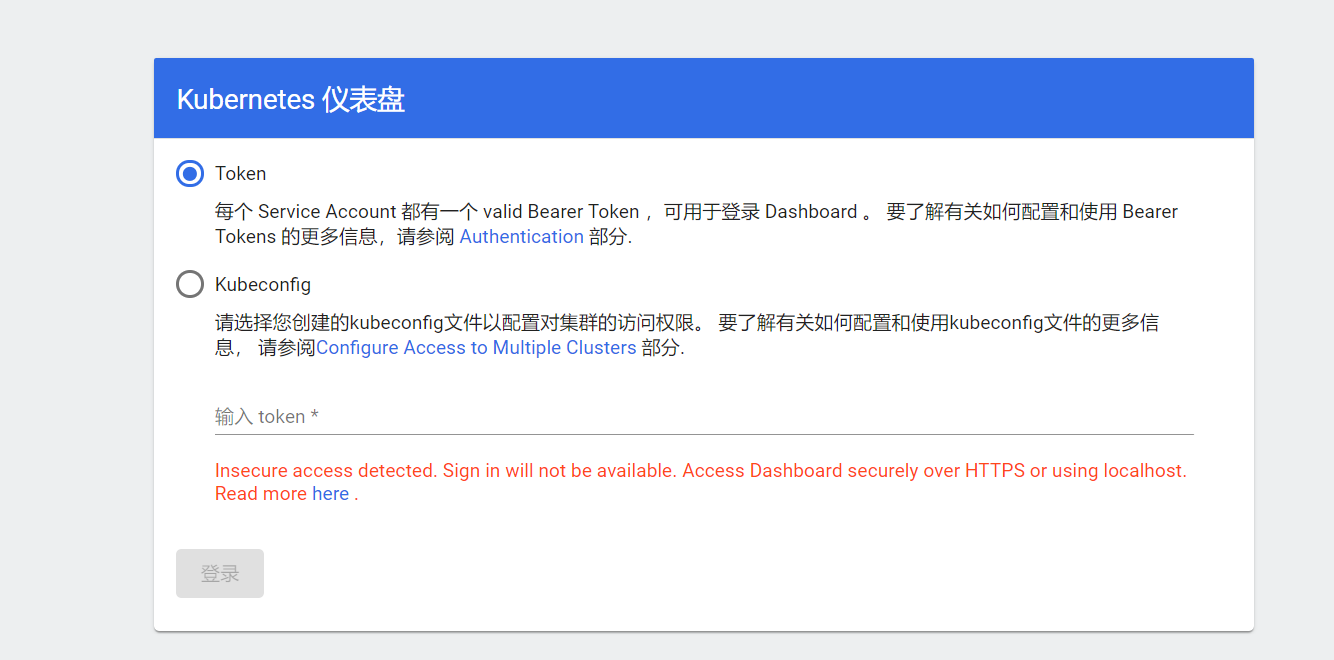
由于笔者的 k8s 集群安装在虚拟机中,且通过内网中的其他设备访问,若按照官方的方法安装,使用 kubectl proxy 的方式访问时,会提示当前的网络环境不安全,需要通过 localhost 或者 HTTPS 的方法访问,因此,需要暴露出相关的端口,使用 https 的方式才能登录。
-
下载 yaml 配置
wget https://raw.githubusercontent.com/kubernetes/dashboard/v2.0.1/aio/deploy/recommended.yaml -
对该 yaml 文件进行修改
-
暴露端口:寻找到下述配置区域,在对应位置加入行
type:NodePortkind: Service apiVersion: v1 metadata: labels: k8s-app: kubernetes-dashboard name: kubernetes-dashboard namespace: kubernetes-dashboard spec: ports: - port: 443 targetPort: 8443 type: NodePort #加入该行 selector: k8s-app: kubernetes-dashboard -
配置自签名证书位置:由于默认的证书无法使用 https 连接,需要我们手动生成自己的证书,在配置文件中,首先修改证书相关设置:
kind: Deployment apiVersion: apps/v1 metadata: labels: k8s-app: kubernetes-dashboard name: kubernetes-dashboard namespace: kubernetes-dashboard spec: replicas: 1 revisionHistoryLimit: 10 selector: matchLabels: k8s-app: kubernetes-dashboard template: metadata: labels: k8s-app: kubernetes-dashboard spec: containers: - name: kubernetes-dashboard image: kubernetesui/dashboard:v2.0.1 imagePullPolicy: Always ports: - containerPort: 8443 protocol: TCP args: - --tls-cert-file=dashboard.crt #加入该行 - --tls-key-file=dashboard.key #加入该行 # - --auto-generate-certificates #注释掉该行 - --namespace=kubernetes-dashboard # Uncomment the following line to manually specify Kubernetes API server Host # If not specified, Dashboard will attempt to auto discover the API server and connect # to it. Uncomment only if the default does not work. # - --apiserver-host=http://my-address:port -
增加 admin 用户,因为安全原因,默认的用户权限很少,学习使用时,可以加入高权限的 admin 用户,方便管理:
---
apiVersion: v1
kind: ServiceAccount
metadata:
name: admin-user
namespace: kubernetes-dashboard
---
apiVersion: rbac.authorization.k8s.io/v1
kind: ClusterRoleBinding
metadata:
name: admin-user
roleRef:
apiGroup: rbac.authorization.k8s.io
kind: ClusterRole
name: cluster-admin
subjects:
- kind: ServiceAccount
name: admin-user
namespace: kubernetes-dashboard
---
该部分参考:https://github.com/kubernetes/dashboard/blob/master/docs/user/access-control/creating-sample-user.md
-
-
安装 Kubernetes Dashboard
sudo kubectl apply -f recommended.yaml -
生成自定义证书:
cd $HOME/kubernetes/
mkdir certs
# Generate Certs
openssl req -nodes -newkey rsa:2048 -keyout certs/dashboard.key -out certs/dashboard.csr -subj "/C=/ST=/L=/O=/OU=/CN=kubernetes-dashboard"
openssl x509 -req -sha256 -days 365 -in certs/dashboard.csr -signkey certs/dashboard.key -out certs/dashboard.crt
删除原始证书 secret,并添加新证书:
# Add certs to dashboard kubectl delete secret kubernetes-dashboard-certs --namespace=kubernetes-dashboard kubectl create secret generic kubernetes-dashboard-certs --from-file=$HOME/kubernetes/certs -n kubernetes-dashboard -
查看运行状态:
kubectl get pod,deploy,svc -n kubernetes-dashboard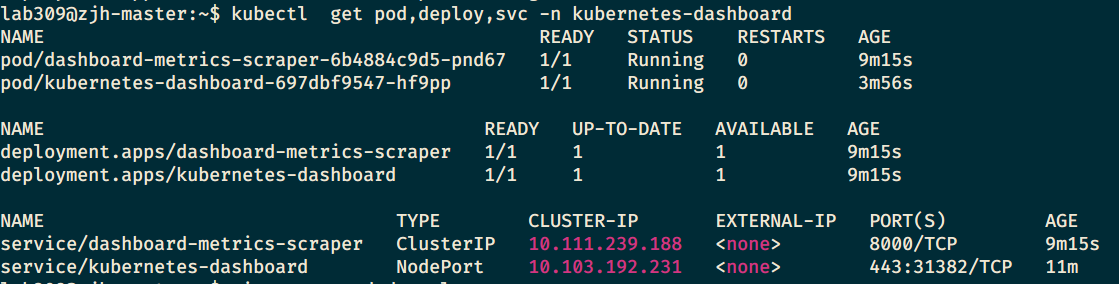
查看日志信息:
kubectl logs kubernetes-dashboard-697dbf9547-hf9pp --namespace=kubernetes-dashboard -
无误后,通过浏览器访问 dashboard
从运行状态中,可以看到当前 dashboard 暴露的端口,比如笔者的 443 端口映射到了 31382 端口上,因此直接访问
https://master-ip:端口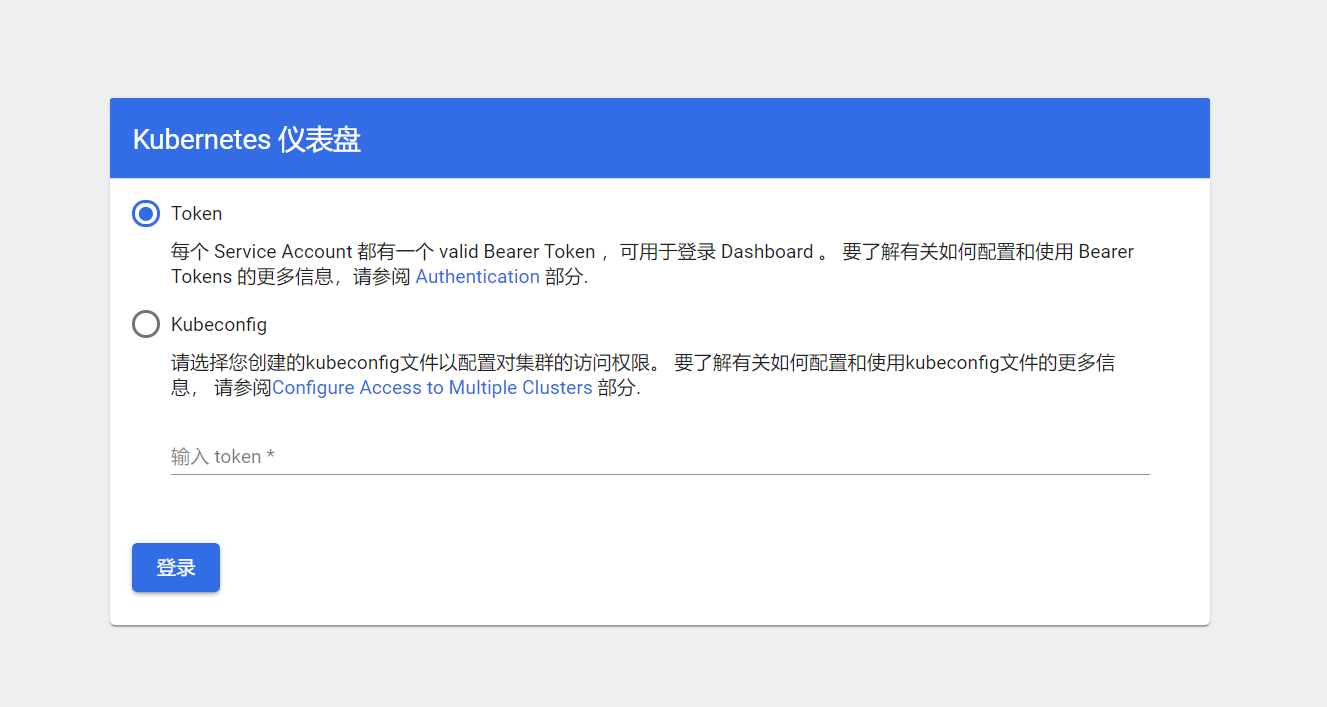
-
生成token
kubectl -n kubernetes-dashboard describe secret $(kubectl -n kubernetes-dashboard get secret | grep admin-user | awk '{print $1}')之后终端会显示超级长一串 token,将该 token 粘贴到浏览器,就可以进入 Dashboard
参考资料:
Kubernetes Handbook——Kubernetes中文指南/云原生应用架构实践手册:https://jimmysong.io/kubernetes-handbook/
kubernetes-dashboard(1.8.3)部署与踩坑:https://www.cnblogs.com/rainingnight/p/deploying-k8s-dashboard-ui.html
k8s dashboard 的http接口改造:https://juejin.im/post/5d749d95518825770c43a7e9
kubernetes dashboard在ssl的各种场景下的手动部署:https://www.servicemesher.com/blog/general-kubernetes-dashboard/
简单了解一下K8S,并搭建自己的集群: https://zhuanlan.zhihu.com/p/97605697?utm_source=qq&utm_medium=social&utm_oi=58758625492992
_(:3 」∠)_